Showing posts with label Simplicity. Show all posts

Saturday, March 3, 2012

$60 Hall Closet Revamp

To put it nicely, our house is very cozy. (r.e. - small, at least downstairs).

I've already posted about my open floor plan, which I adore, but we do have some space constraints that force me to get creative when it comes to storage. We have one small coat closet downstairs and no pantry or storage closets, so I've had to use this closet to house all of our stuff that compiles and compounds over the years.

Not to mention, I'm bracing for much more stuff to pile up once the baby arrives (any day now!). The ugly, mis-matched state of affairs was pretty sad to look at so I needed to identify what purpose this space needs to serve.

Before I shock you with the ugly "before" picture, here is my pretty hall closet now:


But here it what it looked like before:
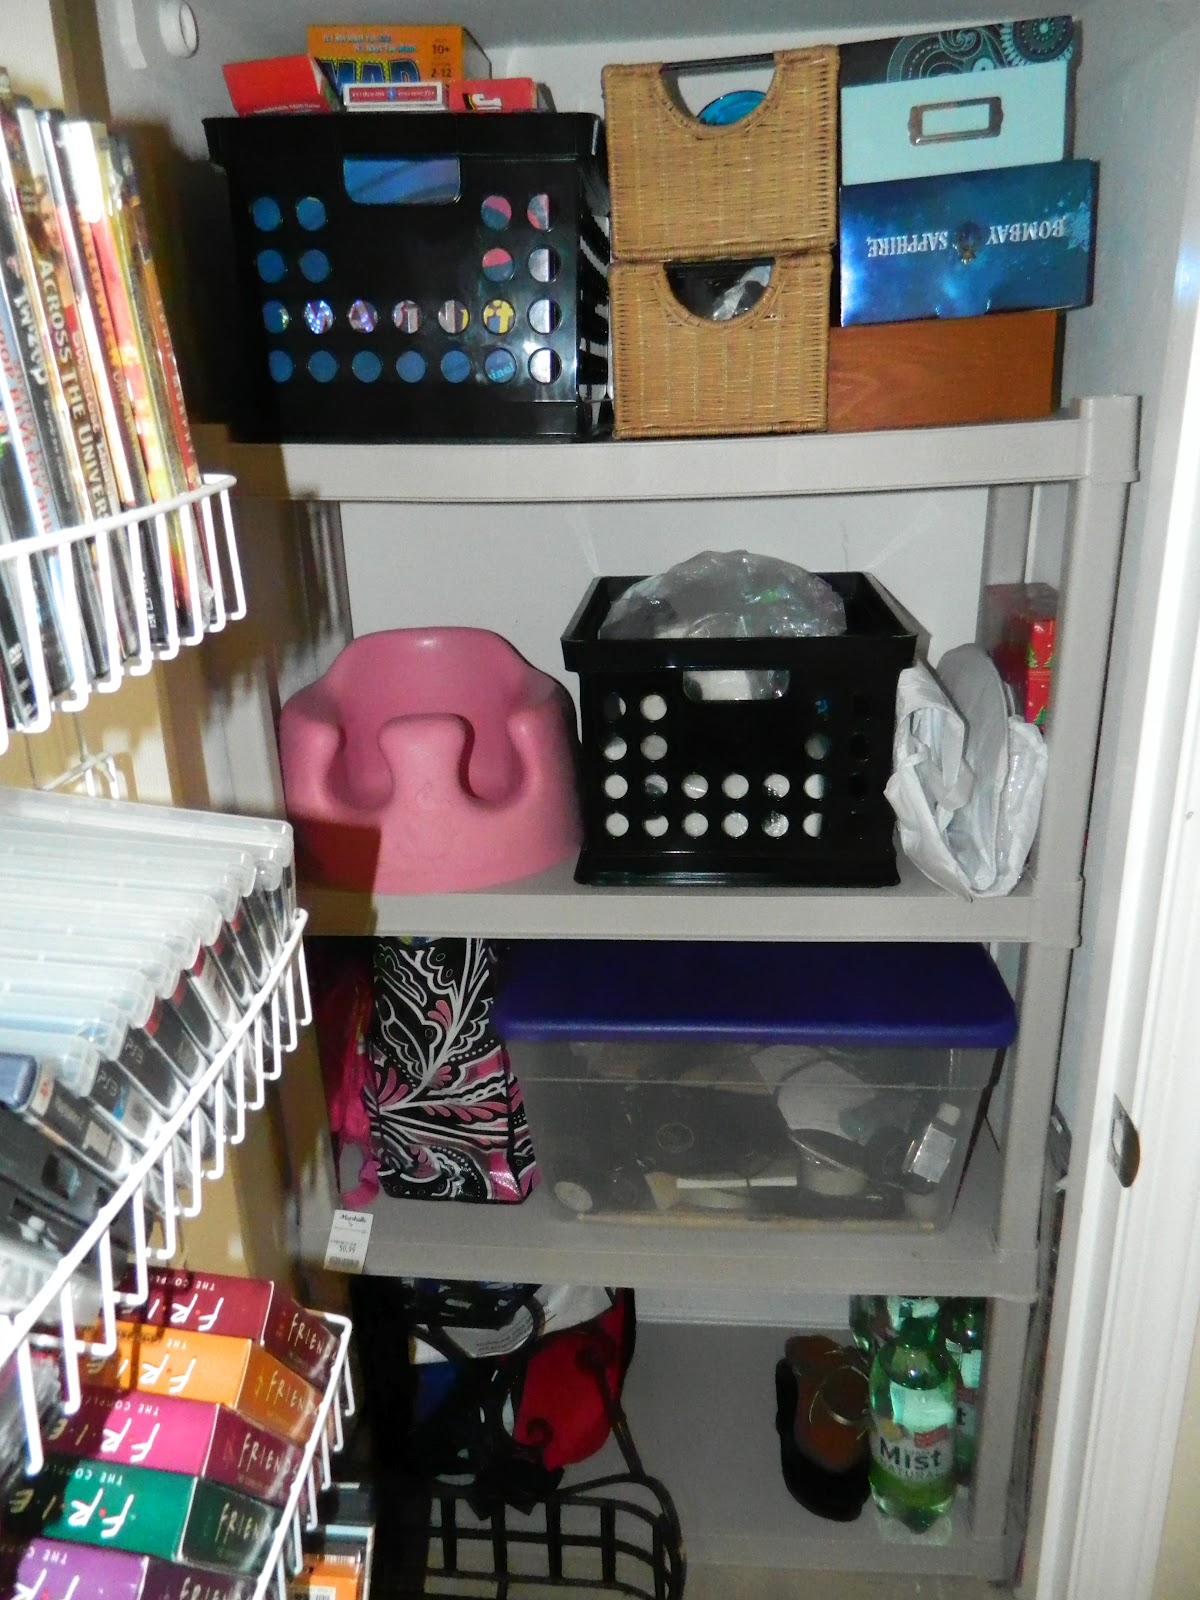

Pretty ugly, right?

So I broke things down into several main storage needs that must be filled:
  • My husband's work accessories (he's got a lot of gear, and always comes home with paperwork and notebooks that I cannot throw away! Argghhhh!)
  • My hudband's hockey stuff (same idea here - just a bunch of crap I can't throw away, and must be at the ready when he takes off for a game)
  • Games (these include board games, party games and accessories for our PS3, xBox, and that motion-sensor game thingey, including all cords and cables. Obviously I'm not a huge gamer.)
  • Batteries/Camera/Camera accessories. (no more searching through the house for the USB cable to upload pics, or for those AAA batteries you need in a pinch)
  • Toys! (we hardly have any yet, but I know we'll need a place to stash them downstairs when I want to do a quick tidy-up without running upstairs to the baby's room)
A quick trip to Target and a peek through the clearance, and I came up with this:

Now, think back to kindergarten when everyone had their own little cubby. That wasn't such a bad idea!

I bought nine of these canvas storage cubes for $6 each, and simply filled them up with our stuff.


To brighten things up a little more, I found these vibrant cards in the clearance end-cap of the greeting card section:


Then I just wrote with Sharpie on some sticky labels, slapped them on these cards (which I glued shut with a gluestick), and hot-glued the finished product to the front of my bins, like this:


Of course, I measured the width and depth of my shelves before buying these cubes. They happened to be 10x10, which fit my 30-inch shevles perfectly! And I love how the bright colors make this a much more cheerful space.

I needed bigger storage on the bottom shelf, so I re-used some old plastic bins we had and slapped some labels on those too.


I just love that everything has it's own little place!

My next goal is to remove the hanging DVD rack on the door, get some media file bins from The Container Store, and trash the bulky containers altogether. Once we start building up a movie collection for the little one, we will keep those in their cases so she can pick and choose what she wants to watch. But for our DVD collection, it's just too bulky and taking up valuable real estate on the inside of the closet door.

Down the road, I'm thinking we'll use another kind of over-the-door storage rack to corral kid stuff or other odds and ends. Oh, and I have a shoe rack and coat/purse hooks in the entry way, making the need for coats in my "coat closet" obsolete. Here's a pic:


And here's one more look at my cheap, quick and easy, $60 hall closet revamp:


Now it's on to the next project!


Thursday, February 16, 2012

Laundry Room Love

Ironically, my laundry room is one of my favorite spaces in my house, despite my hatred for the actual task of doing laundry.


I say this because it's one of the few rooms where everything has a perfect little place, and I know exactly where to find just what I need. The rest of the house is still obsessively organized - don't get me wrong - but I'm still in the process of beautifying my organization systems so they are visually pleasing and blend with my décor.


So without further ado, here's a peek into the method behind my madness:


This room is right at the top of our stairs, so it has to look nice because it's the first thing people see when they go upstairs. You can't really tell in the picture, but the walls are a very soft blue. We also have a closet behind the door, which is being used to store extra bed linens, gift wrapping supplies, and Space Bags filled with extra pillows and things. I am not showing you yet, because it's a mess and on my to-do list of organizing!


My goal here was to eliminate "dead space." So, we installed these cabinets purchased on sale from Home Depot, and I screwed in some cute door pulls. Then, I found these black canvas storage bins on clearance at Target, perfect for extra storage above the cabinets! Finally, I pushed the washer and dryer apart so I could store our laundry detergent, dryer sheets, wastebasket and a mini step-stool in the storage cart between them.


Here is the best part: the organization! I just corralled everything into these little bins and made labels for each one. The blue ones were from the Dollar Tree, the white ones were from Save Mart and the wicker ones were from Target on clearance!


The left cabinet holds bins labeled "cleaning products" and "pet odor & carpet care." I don't have a label maker yet, or any fancy crafty stuff to make the labels look cuter, but I did have some leftover place cards from the Dollar Tree from a previous project. So I just used a silver Sharpie and labeled away.


I used the same idea here, and just used double-sided tape to label which towels go where. I'm kind of against folding towels all perfectly, when you're just going to use them anyway, so these baskets are just perfect to toss my small towels and rags into very easily.


The right cabinet has bins for "ironing & uniform care" (for my husband) and "swiffer pads & wipes." I like to keep things like starch, shoe shining stuff, safety pins, iron-on hem tape (my favorite!) and other ironing-related things together.


I also labeled these baskets for all of our extra stuff. We keep our cat food and litter box in the laundry room, so we have a bunch of cat stuff in one basket, and then we've got baskets for our vacuum stuff and other miscellaneous cleaning supplies like sponges, scrubbies, extra spray bottles, etc.


Behind the door, I used an over-the-door coat hanger for my Swiffers and my ironing board. The giant baby bottle is actually a piggy bank that I got at my baby shower a couple of weeks ago. It was filled with Hershey's Kisses which are now mysteriously gone, but that's neither here nor there :) My point is, I plan to use it for coins I pull out of pockets when I'm doing laundry. I just threw it on the laundry cart so it's handy when I need it!


Well, that's pretty much it for now. My next project will be tackling the closet on the other side of the room, so hopefully I'll be posting about that soon. And I want to get a few hampers for whites, darks and colors, because we currently just sort them into piles from our closet hamper. But with the baby coming, I know laundry will start piling up faster!


But for now, thanks for stopping my and not laughing at how much I love my laundry room!


Thursday, February 9, 2012

My Perfect Master Suite

I wouldn't consider myself a feng shui master, but I think there's something to be said for a balanced bedroom. Or a balanced room in general.

 
It's hard to get completely comfortable and fall asleep blissfully when you have ugly, mismatched furniture glaring at you or piles of clothes encroaching on your comfort zone. That's why there are a few key components to a obtaining the perfect bedroom: storage, function and simplicity.


Storage: For most people, the bedroom is an extension of the closet. This means, that frantic morning routine where you try on - and rip off - several articles of clothing before settling on a suitable outfit, can wreak havoc on your zen den. It's pretty unreasonable to expect yourself to neatly hang up each item before running out the door to work, so it's important to have easily accessible baskets, bins or "clean clothes" hampers at the ready. Case in point: my perfectly functional closet:


Here, I have a few baskets right underneath where we hang our clothes in the closet. I have labeled them "Hang Up," "Fold," and "Hand Wash." The first basket is where I throw my "reject" clothes in the morning, before I hang them up that night. The "Fold" basket is for miscellaneous clothes that need to be folded, including items I've tried on in the morning. The "Hand Wash" basket is self-explanatory. You can label whatever works for you, but the point is that labeling will encourage you to keep things up, because everything has a nice little place.


You'll also notice my handy plastic storage drawers from Target. They provide just enough extra stroage for our closet, for things we can't fit in our dressers. I don't have a fancy label maker, so I just typed up and printed out some "labels" on the computer and used some good old scotch tape to ID the contents of each drawer.


This was a cheap and lazy take on a Pinterest idea. The example was painted and cuter, but this is just inside our closet so I didn't put that much effort into making it look pretty. I just got some peg board and hooks from the hardware store, and screwed the board onto the wall behind our closet door. I hang my necklaces, headbands and scarves on here, and it works great! Plus, I'm more likely to wear stuff when it's visually displayed for me, and easy to grab and throw on.

 
Function: Keep your daily essentials where you can easily grab them, and be realistic about putting them back. For example, you'll be more likely to put your often-used hoodies and jackets away if "away" is a convenient hook behind your door. And you'll be more likely to put your toothbrush away if "away" is a designated shelf inside your medicine cabinet where it can easily be tucked away.


Simplicity: No matter if you've got a small space or a large space, less is always more when it comes to decorating a master bedroom. You want this to be the most serene, calm place in your entire house, so why junk it up with too much stuff on the walls? Pick neutral, organic colors and keep your nightstands and dresser tops free of clutter. This can be achieved by using baskets and bins to corral your odds and ends into a central location. When the bins are full, carry them around and put all of the contents where they belong.


This is our master bedroom. The headboard was made out of a footboard we found on clearance, elevated about 2 1/2 feet by being attached to some 2x4s. (My mom did this for us, so you'll need someone with knowledge and experience in woodworking). Then, she painted the whole thing a glossy black. We secured it to the wall with a few strips of heavy duty Velcro, of all things, and it just stands alone.


Our bedroom set is from Target, purchased several years ago. It wasn't exactly dirt cheap, but obviously very affordable compared to designer stores, as it came from Target. My philosophy with bedroom sets is: look for deals, but don't settle for mismatched pieces that you don't love. A matching set will not only give the room an instant "designer" look, but create a feeling of continuity that will be pleasing to look at, and therefore relaxing to your tired eyes. (r.e.: you'll feel good, so you'll sleep good!)


This is another one of my mom's creations. She used wood glue to secure eight black-framed mirrors from Ikea to particle board. Then, she bordered the whole thing with wood borders from the craft store (painted black), also secured with wood glue. To finish it off, she placed three button-looking wood accent pieces to the inside corners, almost reminiscent of a "tufted" look, if this were a fabric headboard or something. The whole piece is very cheap, very elegant and just the right touch of masculine and feminine.


Remember what I said about functionality? Well this is an example. I used a black paperclip (the clampy kind) to run my phone charger cord along the placemat on my nightstand. That way, I never have to search for the cord on the ground between my bed and the stand! I saw something like this on Pinterest and had to do it :)


We have four large picture windows in our bedroom, which is great. It's not so great for sleeping in, however, so I hung floor-to-ceiling blackout drapes along the entire wall, layered with some cute white sheers I got on clearance, to add some softness to the institutional-looking blackout drapes. Now, the drapes not only give us a nearly pitch-black room during the daylight hours, but they function as a statement wall with the graphic pattern on the sheer drapes. Function + style = love.

Here is our dresser:


And here is our armoire:

Nothing too exciting to report here, except the fact that I like to keep the furniture tops free of clutter and excess decorations. I just have two baskets on the dresser for holding miscellaneous stuff that comes out of our pockets, and obviously the TV takes up most of the space on the armoire. In the near future, I would like to make a custom TV "frame" out of crown molding, maybe painted blue to match our bedding. We will need to mount the TV on the wall first, then attack this project.

But for now, thanks for reading my little tips and going through my design process with me!